Managing a chronic condition often feels like a part-time job, filled with endless appointments and trips to the clinic. This constant demand on your time and energy can be just as draining as the condition itself. At-home phototherapy offers a way to take back control. It provides the same clinical-strength treatment in a way that fits your life, allowing for the consistency that is so crucial for seeing real results. This isn’t about finding a shortcut; it’s about finding a smarter, more sustainable way to manage your health. We’ll explore how full body phototherapy at home works, how it compares to in-office visits, and how you can get started safely.
Key Takeaways
- Phototherapy is a targeted medical treatment, not a tanning session: It uses a specific, prescribed wavelength of light (narrowband UVB) to calm the overactive immune cells that cause inflammation in conditions like psoriasis, eczema, and vitiligo.
- A doctor’s prescription and guidance are essential for your safety: Your provider determines the correct starting dose and treatment schedule, making medical oversight a non-negotiable part of using this powerful therapy correctly and effectively at home.
- Consistency and careful monitoring are your keys to success: Sticking to your prescribed schedule, maintaining the correct distance from the device, and paying close attention to your skin’s reaction after each session will help you achieve the best results safely.
What Is Full-Body Phototherapy and How Does It Work?
If you’re dealing with an autoimmune condition that affects your skin, you’ve likely tried countless creams and medications. Full-body phototherapy is a different approach. It’s a medical treatment that uses specific wavelengths of ultraviolet (UV) light to calm inflammation and reduce symptoms. Think of it as a prescribed, therapeutic dose of light—not the same as a tanning bed. This therapy is a well-established treatment for inflammatory skin conditions like psoriasis, eczema, and vitiligo, many of which are connected to an overactive immune system.
The best part? You don’t always have to go to a clinic to get it. With modern, FDA-cleared devices, you can perform full-body phototherapy right in the comfort of your own home. This allows you to consistently manage your condition on your own schedule. By exposing your skin to controlled amounts of light, you can directly address the source of the inflammation. It’s one of the most effective innovative treatment options available for finding long-term relief and reclaiming control over your skin health.
How Does Light Therapy Actually Work?
At its core, light therapy works by gently resetting the immune response in your skin. When you have an autoimmune-related skin condition, your immune cells can become overactive, leading to the inflammation, redness, and discomfort you feel. Specific wavelengths of UV light penetrate the skin and help calm these cells down. This process helps slow down the rapid growth of skin cells in conditions like psoriasis and reduces the inflammatory reaction in eczema.
Scientifically, this is done by regulating inflammation and encouraging pathogenic cells—the ones causing the problem—to go through a natural process of cell death. Understanding the mechanisms of action shows us that phototherapy isn’t just masking symptoms; it’s working on a cellular level to restore balance to your skin.
Narrowband vs. Broadband UVB: What’s the Difference?
When you start looking into UVB phototherapy, you’ll see two terms: narrowband and broadband. Broadband UVB was an earlier form of light therapy that used a wide spectrum of UV rays. While it was effective, it also exposed the skin to wavelengths that weren’t always necessary or beneficial. Think of it like using a wide-nozzle hose when you only need to water one specific plant.
Narrowband UVB (NBUVB) is the modern gold standard. It isolates a very specific, narrow range of the UVB light spectrum (around 311 nm) that is most effective for treating skin conditions. This targeted phototherapy approach delivers the therapeutic benefits without the extra, less helpful rays. Because of its precision, NBUVB is considered a first-line treatment for many autoimmune skin diseases, offering a better safety profile and more effective results.
What Conditions Can You Treat with At-Home Phototherapy?
At-home phototherapy is a powerful tool for managing health conditions driven by an overactive immune system. While it’s known for treating skin issues, its ability to calm inflammation means its benefits can be more than skin deep. Narrowband UVB (NB-UVB) light works by slowing rapid cell growth and reducing the inflammation behind many autoimmune disorders. This makes it a go-to option for a safe, effective treatment you can manage from home with your doctor’s guidance. Here are some of the most common conditions that respond well to this therapy.
Psoriasis and Other Inflammatory Skin Conditions
If you have psoriasis, you know the frustrating cycle of flare-ups. The good news is that phototherapy is a highly effective treatment. In fact, narrowband UVB is often considered a first-line treatment for moderate to severe psoriasis because it slows the overproduction of skin cells and reduces inflammation. The same goes for other inflammatory conditions like eczema. It’s a reliable way to manage the underlying causes, offering relief from itching and discomfort without relying solely on topical creams or systemic medications.
Skin Conditions Linked to Autoimmune Disease
Many skin conditions are outward signs of an underlying autoimmune issue. When your immune system mistakenly attacks healthy cells, it can show up on your skin as rashes or inflammation. At-home phototherapy is an excellent way to manage these symptoms directly. By using targeted light, you can help lessen or eliminate the symptoms of chronic skin conditions tied to autoimmune diseases. Managing visible symptoms can also have a positive ripple effect on your overall well-being, a huge benefit when you’re dealing with the daily challenges of a chronic condition.
Vitiligo and Other Pigmentation Disorders
For conditions like vitiligo, where the skin loses its pigment-producing cells, at-home phototherapy can be a game-changer. It is a safe, effective, non-drug option that stimulates repigmentation. One of the biggest advantages is treating yourself consistently in the privacy of your own home. Despite its effectiveness, home phototherapy is often underutilized due to misconceptions about its safety. With the right equipment and medical supervision, it offers a practical way to manage pigmentation disorders and regain skin tone over time, putting you in control of your treatment.
What Types of At-Home Phototherapy Devices Are There?
Once you and your doctor decide at-home phototherapy is right for you, the next step is finding the right device. At-home units fall into a few main categories based on the size of the area you need to treat. Your choice will depend on whether your condition affects small, specific spots or requires more widespread treatment. From handheld wands to full-body panels, there’s a system designed to fit your specific needs and help you manage your treatment plan effectively from home.
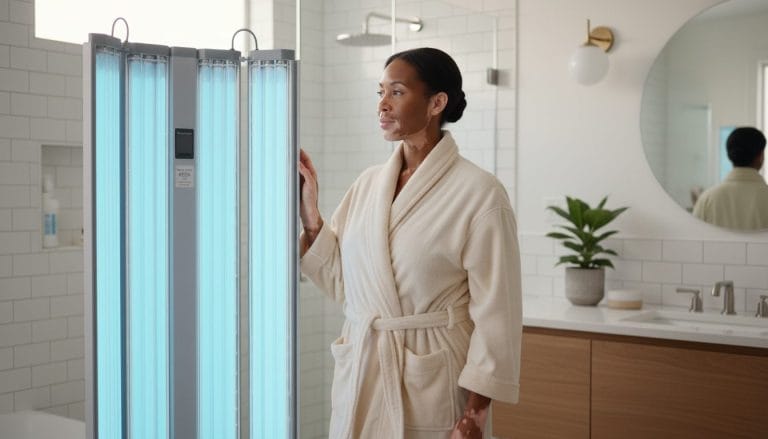
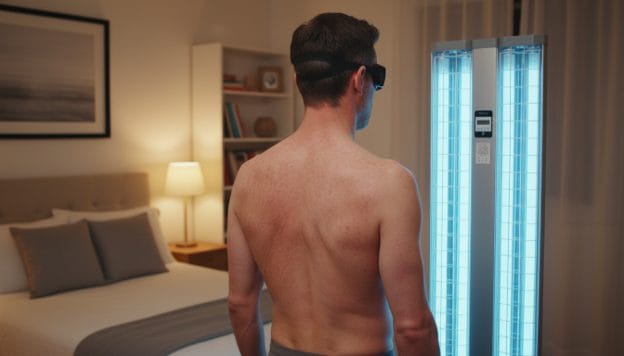
Full-Body Cabinets and Panels
If you’re dealing with a condition that affects large areas of your body, a full-body unit is the most efficient option. These systems include large panels you stand in front of or full cabinets you can step inside for complete coverage. They deliver a consistent dose of light to your entire body in one session, making them ideal for widespread conditions or for managing systemic inflammation. While they require more space in your home, they offer the convenience of a clinical-style treatment, saving you frequent trips to the doctor’s office. These are powerful tools in a plan for autoimmune disease management and can make a significant difference in your daily routine.
Handheld Units for Targeted Spots
For conditions limited to smaller, specific areas, a handheld device offers precision and flexibility. These portable units are perfect for treating tiny spots on your hands, feet, or scalp. Most targeted phototherapy devices emit narrowband UVB light, allowing you to focus the treatment exactly where you need it without exposing unaffected skin. This makes them a great choice for vitiligo or isolated patches of psoriasis or eczema. Their small size also makes them easy to store and travel with, so you can stick to your treatment schedule wherever you are without disruption.
Key Features to Look For in a Device
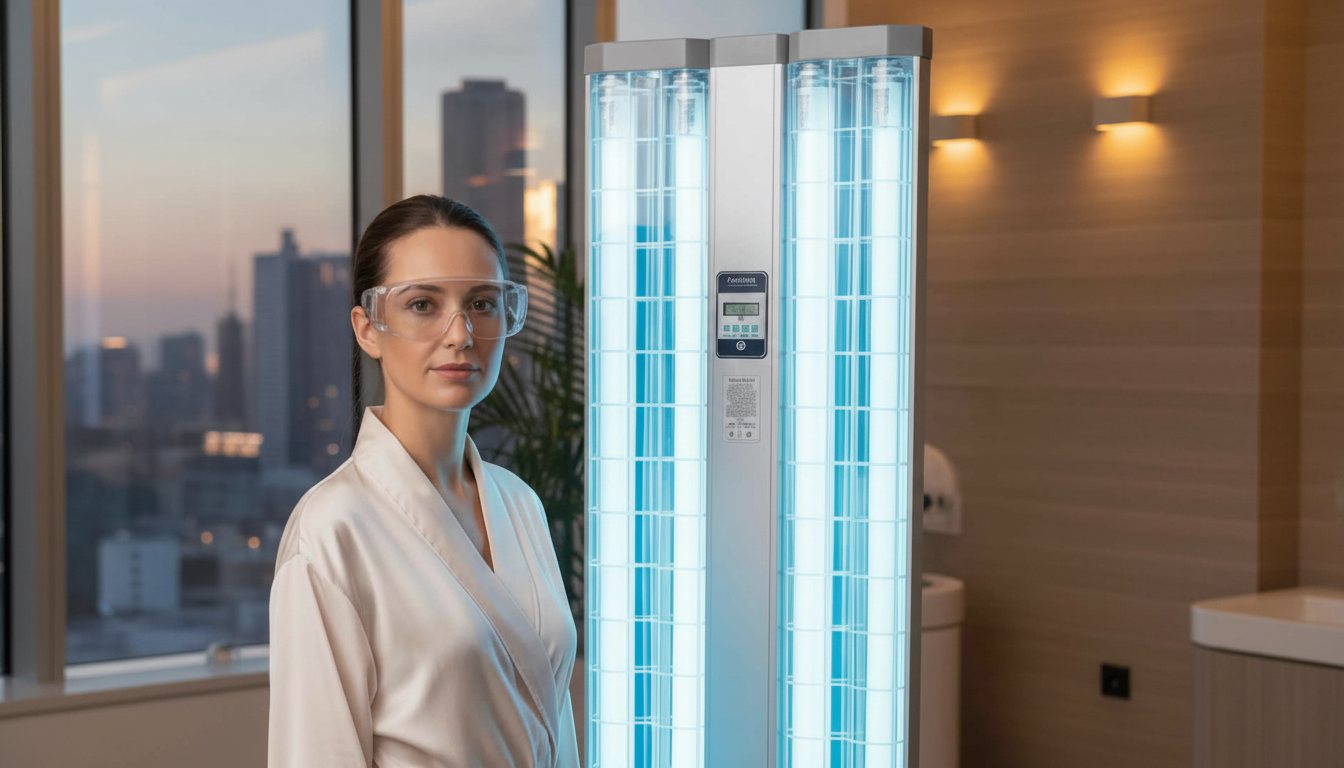
When choosing a device, safety is paramount. Be careful of unregulated devices sold online, as their safety and effectiveness are unknown. Always look for FDA-cleared equipment prescribed by your healthcare provider to ensure you’re getting a reliable product. Reputable home phototherapy units come with essential safety features, including key-locked switches to prevent unauthorized use and precise timers that limit your treatment to the exact duration your doctor prescribes. Many also have automatic shut-offs that activate if there’s a system malfunction. These features ensure you can perform your treatments at home with confidence, knowing your device is both effective and safe.
Do I Need a Prescription for At-Home Phototherapy?
Yes, if you’re in the United States, you will need a doctor’s prescription to purchase an at-home phototherapy unit. While that might seem like an extra step, it’s a crucial one designed to protect your health and ensure you get the best possible results from your treatment. Think of it as a partnership with your healthcare provider to create a safe and effective plan tailored just for you. This requirement ensures you’re getting a medical-grade, FDA-cleared device that’s appropriate for your specific needs, rather than a less effective consumer gadget.
The good news is that because it’s a prescribed treatment, many insurance plans will cover home phototherapy, especially if you’ve already tried other options without success. This makes it a more accessible path for managing your condition long-term. Ultimately, the prescription process is about putting your safety first and setting you up for a successful treatment experience from the very beginning.
Why Medical Oversight Is Required
Having a doctor oversee your treatment is essential, even when you’re doing it from the comfort of your home. Phototherapy uses ultraviolet (UV) radiation, a powerful tool that requires careful management. Without proper guidance on exposure times and frequency, UV radiation can damage the skin and cause serious burns, similar to a severe sunburn. Your doctor’s role is to establish a safe starting dose and a schedule for gradually increasing treatment times based on your skin type and condition. This medical supervision helps you avoid potential side effects and ensures the treatment is working effectively, allowing for adjustments as you progress.
How to Talk to Your Doctor About Phototherapy
Starting a conversation with your doctor about a new treatment can feel intimidating, but you are your own best advocate. The best approach is to be direct and prepared. Schedule an appointment specifically to discuss if phototherapy is right for you and your condition. You can start by saying something like, “I’ve been researching at-home phototherapy for my symptoms and I’d like to know if it’s an option for me.” It’s helpful to know that some physicians may not be fully familiar with the latest research or protocols for home-based units. By bringing articles or information about the specific type of device you’re interested in, you can have a more productive conversation about creating a treatment plan together.
Is At-Home Phototherapy Safe? Potential Risks and Side Effects
It’s completely normal to ask about the safety of bringing a medical treatment into your home. The short answer is yes, at-home phototherapy is a safe and effective option for managing many conditions when used correctly and under the guidance of a healthcare provider. The key is understanding that this isn’t like using a tanning bed; it’s a precise medical therapy that requires you to follow a prescribed plan.
The main risks associated with at-home phototherapy are manageable and largely preventable. They stem from improper use, like overexposure or not protecting your eyes and skin properly. Think of it as a partnership: your doctor provides the expert guidance and prescription, the device delivers a controlled dose of therapeutic light, and you follow the instructions carefully to get the benefits while minimizing risks. We’ll walk through the most important safety considerations so you can feel confident and prepared as you start your treatment journey. By being informed, you can ensure your experience with at-home phototherapy is both safe and successful.
Protecting Your Eyes and Prepping Your Skin
This is the most important rule of phototherapy: always protect your eyes. Every single time. Even if you’re just doing a quick session, UVB light can be harmful to your eyes without proper protection. Your phototherapy device will come with a pair of UV-blocking goggles, and you should consider them a non-negotiable part of your treatment uniform. Closing your eyes isn’t enough, as the skin on your eyelids is too thin to provide adequate protection.
As for your skin, the best practice is to start with a clean slate. Before each session, make sure your skin is clean and dry, without any lotions, perfumes, or cosmetics. Some products can make your skin more sensitive to light or even cause an unwanted reaction.
Avoiding Burns and Overexposure
The most common side effect of UVB phototherapy is redness or a mild, sunburn-like reaction. This is a sign of overexposure, and it’s entirely preventable. Home phototherapy is designed to be a gradual process. Your doctor will prescribe a treatment schedule that starts with very short exposure times, often just a matter of seconds.
You will slowly increase the duration of your sessions as your skin acclimates to the light. It’s crucial to stick to this schedule and never try to speed up the process with longer or more frequent sessions. If you miss a treatment, don’t double up on the next one. Just resume your regular schedule and let your doctor know. Consistent, controlled exposure is the key to getting results without irritation.
Understanding Medication Interactions
Open communication with your doctor is essential for your safety. Before you begin phototherapy, you must tell your physician about every medication you take—including prescriptions, over-the-counter drugs, vitamins, and herbal supplements. Some substances can make your skin more sensitive to UV light, a reaction known as photosensitivity. This increases your risk of burning, even at your prescribed exposure time.
This isn’t a one-time conversation. If you start or stop any medication during your course of phototherapy, you need to let your doctor know right away. They can advise you on whether you need to adjust your treatment plan. This is a core reason why medical oversight is required for these innovative treatment options and why you can’t just buy a device without a prescription.
How to Use Your At-Home Phototherapy Device Safely
Bringing your phototherapy treatment home is an exciting step toward managing your health, but it’s important to remember that you’re using a powerful medical device. Using it safely is the key to getting the results you want without any setbacks. Think of your phototherapy unit as a prescription—it requires precise dosing and careful attention to get the full benefit. Your doctor will provide a detailed treatment plan, and your job is to follow it closely.
The foundation of safe at-home phototherapy rests on three simple principles: starting with very short exposure times, carefully monitoring your skin’s reaction, and being consistent with your setup for every single session. This partnership between you and your care provider is what makes at-home treatment one of the most effective innovative treatment options available. By taking the time to learn the proper procedures, you can confidently and safely manage your condition from the comfort of your home.
Your First Session: Setting Exposure Times
When you begin phototherapy, the motto is “start low and go slow.” Your initial sessions will be surprisingly short, often lasting just a few seconds. This isn’t a mistake—it’s a crucial safety measure. Your doctor calculates this starting dose based on your skin type and condition to allow your skin to acclimate to the UVB light. The goal is to find the minimum amount of light that produces a therapeutic effect without causing a burn.
Your prescription will outline a schedule, which for many conditions involves treatments three to five times per week. You’ll gradually increase your exposure time with each session, following the specific instructions from your doctor. It’s essential that you stick to this schedule precisely and never increase the time on your own. This gradual increase is the safest way to achieve the best results from your phototherapy treatment.
How to Monitor Your Skin and Adjust Your Plan
After each session, your most important job is to become an expert observer of your own skin. A slight, faint pinkness 12 to 24 hours after treatment is often the desired response—it shows the light is working. However, you should never experience pain, significant redness, tenderness, or blistering. These are signs of a burn, which means the exposure was too long.
Think of this as a team effort. You are your doctor’s eyes and ears between appointments. Keep a simple log of your treatment times and how your skin looks and feels afterward. If you notice any signs of overexposure, stop your treatments and contact your doctor right away. They will use your feedback to adjust the plan. This careful system of home phototherapy monitoring ensures your treatment remains both safe and effective over the long term.
Finding the Right Distance and Position
Consistency is everything in phototherapy. The amount of light energy your skin receives depends heavily on its distance from the bulbs. Even a few inches can make a big difference in the dose, so it’s vital to maintain the exact same distance for every treatment. Your device’s manual and your doctor will specify the correct distance you should maintain from the unit.
To ensure you’re consistent, use a measuring tape for your first few sessions and consider placing a small, non-slip mat or tape on the floor to mark exactly where to stand. For full-body units, always position yourself in the center to get even coverage. If you’re using a smaller, handheld device, make sure you treat each area for the prescribed amount of time. Following these simple steps will help you deliver a precise, therapeutic dose every time.
What to Expect From Your At-Home Treatment
Starting any new treatment comes with questions, and at-home phototherapy is no different. It’s a commitment, but it’s one that can offer significant relief when you stick with it. Your results will depend on your specific condition, your consistency, and the treatment plan you create with your doctor. It’s not an overnight fix, but a gradual process of calming your body’s inflammatory responses. The key to success is patience and precision. You’ll begin with very short exposure times and slowly increase them based on your skin’s reaction, always under the guidance of your care provider.
Think of it as a partnership between you, your doctor, and your device. Over the next few weeks and months, you’ll learn how your body responds and find a rhythm that works for you. While the idea of managing your own treatment might seem intimidating at first, it offers incredible flexibility and puts you in control of your health journey. The goal is to build a sustainable routine that fits into your life, allowing you to manage your symptoms effectively from the comfort of your home. Below, we’ll walk through what the first few weeks might look like, clear up some common myths, and discuss how to plan for long-term success.
Your Treatment Timeline: The First Few Weeks
One of the first questions everyone asks is, “How long will this take?” While the answer is different for everyone, we can look at established protocols for skin conditions to get a general idea. For instance, someone treating psoriasis might start with sessions three to five times per week. Noticeable improvement often begins after about 10 sessions, with significant clearing taking around 20 to 30 treatments. Remember, this is just an example. Your own home phototherapy schedule will be tailored specifically to you by your doctor. The most important thing in these early weeks is consistency. Sticking to your prescribed schedule gives your body the steady, therapeutic light exposure it needs to begin responding.
Common Myths About At-Home Phototherapy
Let’s clear the air on a few things. The biggest myth is that phototherapy is just a fancy tanning bed. This couldn’t be further from the truth. Medical phototherapy uses a very specific, narrow wavelength of UVB light to produce a therapeutic effect, while tanning beds use a broad spectrum of UVA and UVB light that is not medically supervised. Another common concern is safety. While it’s true that UV radiation can be harmful without proper precautions, at-home phototherapy is designed to be safe when used correctly. That’s why it requires a prescription and medical oversight. Following your doctor’s instructions on exposure times and skin protection is essential for avoiding burns and achieving the best results. These common myths shouldn’t prevent you from exploring an effective treatment option.
Planning for Long-Term Maintenance
Once you achieve your desired results, the goal shifts from clearing to maintaining. Phototherapy is often a long-term strategy, and consistency remains just as important for keeping symptoms under control. Your doctor will help you create a maintenance schedule, which will likely involve less frequent sessions than your initial treatment phase. To make it a lasting habit, try integrating it into your daily routine. Many people find that using their device right after a shower or bath can make the treatment more effective and easier to remember. Ultimately, successful long-term management with light therapy relies on staying consistent with your schedule and maintaining an open dialogue with your doctor to make any necessary adjustments over time.
At-Home vs. In-Office Phototherapy: How Do They Compare?
Deciding where to receive phototherapy is a big step in your treatment plan. While in-office sessions have long been the standard, at-home devices offer a compelling alternative. Both are effective ways to manage autoimmune conditions, but they fit different lifestyles and priorities. The right choice for you depends on factors like your schedule, budget, and how you prefer to manage your health. Let’s break down the key differences to help you have a more informed conversation with your doctor.
Comparing Convenience and Cost
One of the biggest advantages of at-home phototherapy is convenience. Fitting multiple weekly trips to a clinic into your schedule can be a challenge, especially when you’re already managing fatigue. Home phototherapy allows you to treat your condition on your own time, in the privacy of your own space—no travel, no waiting rooms, no co-pays for every single visit. While an at-home device requires an upfront investment, it can be more cost-effective in the long run compared to the cumulative cost of repeated clinic appointments. Think of it as a one-time purchase for long-term, consistent care.
Comparing Effectiveness and Consistency
The good news is that you don’t have to sacrifice results for convenience. Studies show that for many conditions, home phototherapy is just as effective as treatments received in a clinic. Narrowband UVB is considered a first-line, effective treatment for many autoimmune-related skin issues. The key to success with light therapy is consistency, and this is where at-home treatment truly shines. Having a device at home makes it much easier to stick to the prescribed schedule your doctor sets. This consistency is crucial for calming inflammation and achieving the best possible results with innovative treatment options.
How to Choose the Right At-Home Phototherapy System for You
Finding the right at-home phototherapy system can feel like a big decision, but it really comes down to two key things: your personal health needs and the support you have from your care provider. Think of it as a partnership. You need a device that fits your lifestyle and targets your specific condition, but you also need professional guidance to use it safely and effectively. At Cytokind, we focus on providing innovative treatment options that put you in control of your health journey, with the full support of your medical team. Let’s walk through how to find the perfect fit for you.
Matching Device Features to Your Needs
The first step is to think about the specifics of your condition. Are you treating small, localized areas, or do you need broader coverage? At-home phototherapy units range from small handheld devices designed for tiny spots to larger panels you can stand in front of for full-body treatment. If you’re managing a few patches of psoriasis or eczema, a targeted wand might be all you need. For more widespread conditions, a full-body panel will be more efficient and ensure even coverage. Consider your space at home and how easily you can fit the treatment into your daily routine. The best device is one you’ll use consistently.
Why Professional Guidance and Support Matter
Even though you’re doing the treatment at home, it’s essential that a doctor oversees your plan. In fact, you’ll need a doctor’s prescription to purchase a medical-grade phototherapy device. This isn’t just a formality; it’s a crucial safety measure. Your doctor will help you determine the right starting dose, create a treatment schedule, and monitor your progress. They can also help you understand and manage any potential side effects. Before you start, it’s important to talk about the risks with your doctor. This partnership ensures you get the best possible results while keeping your skin safe and healthy throughout the process.
Related Articles
- At-Home Phototherapy for Atopic Dermatitis: What to Know
- Phototherapy Definition: A Guide to Light Therapy
- Buy a Home Phototherapy Unit: A Prescription Guide
- Phototherapy – Safe & Effective Treatment for Psoriasis & Eczema
- 4 Best Light Therapy Devices for Autoimmune Disease
Frequently Asked Questions
Is at-home phototherapy just a medical tanning bed? Absolutely not, and it’s an important distinction to make. Tanning beds use a broad, uncontrolled spectrum of UVA and UVB rays primarily for cosmetic tanning. Medical phototherapy uses a very specific, narrow wavelength of light that is clinically proven to calm inflammation and slow rapid cell growth. It’s a targeted medical treatment, which is why it requires a doctor’s prescription and a precise treatment schedule.
How long will it take to see a difference in my skin? Patience and consistency are your best friends with this treatment. It’s a gradual process, not an overnight fix. While every person and condition is different, many people start to see noticeable improvement after several weeks of consistent use, often around 20 to 30 sessions. Sticking to the schedule your doctor prescribes is the most important factor in getting the results you want.
What does a phototherapy session actually feel like? A typical session is surprisingly quick and uneventful. You’ll stand a specific distance from the device for your prescribed time, which may only be a matter of seconds when you first begin. You might feel a gentle warmth from the lights, but you should never feel any pain or burning. The goal is a therapeutic dose of light without any discomfort. Afterward, you just go about your day.
Why do I need a prescription if I’m using the device myself at home? Think of the device as a powerful tool that requires an expert’s instructions to be used correctly. The prescription process ensures you receive a safe, FDA-cleared medical device and, more importantly, that a doctor creates a personalized treatment plan for you. They determine your starting dose and schedule for increasing exposure times, which is essential for preventing burns and making the therapy effective.
Can I stop using my other creams or medications once I start phototherapy? You should never change your current treatment regimen without speaking to your doctor first. Phototherapy can be very effective on its own, but it’s often used in combination with other treatments. Your doctor will advise you on how to best integrate light therapy into your overall care plan. As your condition improves, you and your doctor can decide together if any adjustments to your other medications are needed.